Patch Editor
The Patch Editor allows you to modify existing Sampler patches or create new ones.
A patch consists of one or more samples. A sample is an audio file containing a single note of the instrument the patch is for (e.g., a single piano key).
Samples
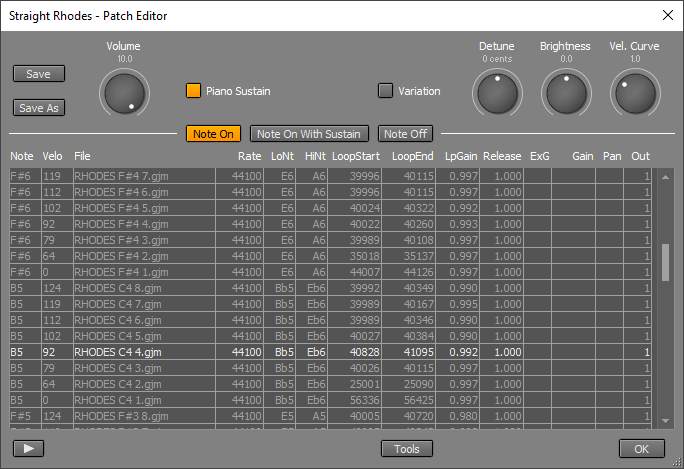
Samples can be triggered by three trigger sources: "Note On", "Note On with Sustain", and "Note Off". Most patches use "Note On" samples only.The main grid lists the samples and their properties. The highlighted row can be edited. You can highlight a row by clicking it. You can click the button in the bottom-left corner to play the highlighted sample.
For every sample the following properties must be defined:
- Note: The note of the recorded sample (e.g., "C5")
- Velocity: The velocity layer the sample is in. The value is the lower limit.
- File: Audio file containing the sample. Can be either mono or stereo.
- Rate: The sample rate of the audio file (e.g., 44100). This parameter can also be used for fine-tuning (example: multiplying the sample rate by 1.0116 increases the perceived pitch by 20 cents).
The following properties are optional:
- Lowest Note: The lowest note this sample will be used for. Use this to override the Sampler's default note assignment rules, or to set the lowest note the patch can produce.
- Highest Note: The highest note this sample will be used for. Use this to override the Sampler's default note assignment rules, or to set the highest note the patch can produce.
- LoopStart: The position in samples at which the loop starts.
- LoopEnd: The position in samples at which the loop ends. Should always be higher than LoopStart.
- LoopGain: The relative volume of each loop iteration compared to the previous one (e.g., "0.900"). If LoopGain equals the sample's level at LoopEnd divided by the level at LoopStart, a natural decay results.
- Release: The time it takes to reach 60 dB attenuation after a note-off event is received. If this value is empty, an infinite release time is used, meaning the sample will play until it reaches the end. This is useful for drum patches.
- Exclusive Group: Only one note can be active at a time per group, so currently playing notes will stop when a new one is triggered. This can be used to mute a hi hat when it is closed. Values range from 1 to 255 (0 = none).
- Gain: Gain level, where 1.000 is neutral.
- Pan: Pan position, where 50 is center.
- Output: Sends sound to output mixer channel 1..8. There is no output mixer if all samples use output 1.
You can add multiple samples with the same note and velocity. They will be used in round-robin fashion. All such samples should have identical Lowest Note and Highest Note values.
Sustain, release, and pedal noise samples
"Note On with Sustain" and "Note Off" samples are typically used in large piano patches.
"Note On with Sustain" samples are used instead of "Note On" samples if the Sustain controller is 64 or higher at the time the note is played.
"Note Off" samples are triggered when a note ends. The Match Note-Off Levels button can be used to automatically match the level of the "Note Off" sample to the current level of the playing note. The sample's Gain property sets the maximum level in this situation.
The highest note (G10) samples of the "Note On with Sustain" and "Note Off" types are used for a special purpose. They are triggered by sustain pedal down and up movements, respectively. They can be used to play samples of the piano pedal noise.
General Controls
- Volume: The overall level of the patch.
- Piano Sustain: Makes the sustain pedal behave like it does on a piano, i.e., it can still "catch" keys that have already been released but whose strings have not yet been completely dampened.
- Variation: Subtly changes the brightness and volume level of each note. This makes the instrument sound more natural. It also helps prevent the "machine-gun" effect when notes are played repetitively.
- Velocity Curve: Controls dynamics.
- Brightness: Controls the relative level of a sample's harmonics.
- Detune: Adjusts the pitch of the patch.
Tip: When a library is opened in the Sampler, the patch with the latest file timestamp will be loaded. So you can open the Patch Editor and click Save to make the current patch the default.
Tools
The Tools menu offers several options:- Loop Editor: Opens the Loop Editor for the highlighted sample (see below).
- GM Drum outputs: Maps samples to 6 outputs (kick, snare, hi-hat, toms, cymbals, other), assuming they are mapped to GM notes.
- All to output 1: Maps all samples to output 1, and removes the output mixer.
- Highlight last played sample: Helps identify which sample caused an issue if you heard something unexpected.
- Remove sample: Removes the highlighted sample.
Loop Editor
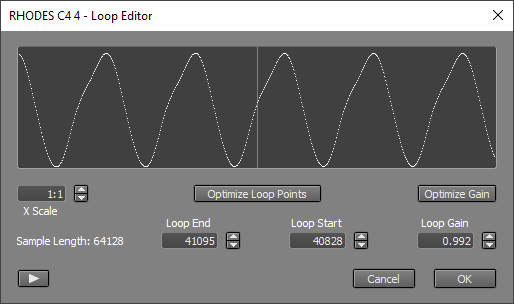
The Loop Editor, available from the Tools menu, helps you set the LoopStart, LoopEnd, and LoopGain properties for the highlighted sample.
The left hand side of the display shows the part before the LoopEnd point. The right hand side shows the part starting at the LoopStart point. Additionally, the left shows a dimmed version of the part before LoopStart, and the right shows a dimmed version of the part after LoopEnd. The loop will sound good if the bright curves align with the dimmed ones, ensuring a seamless connection in the middle of the display.
The LoopStart, LoopEnd, and LoopGain boxes contain the values corresponding to those in the Patch Editor.
The most important feature is the optimize buttons:Optimize Loop Points moves LoopEnd to a zero crossing and finds the best LoopStart to go with it.Optimize Gain finds the best loop gain.
The button in the bottom-left corner plays the sample, so you can hear how the current settings sound.